There’s a number of games, we’re often told, that really don’t do one-shots well. Often this is because of complexity, or a detailed (and unnecessary) background setting, all things that a skilled one-shot GM can work around. But with Blades in the Dark and other Forged in the Dark (FITD) games, where there’s a structure of play that involves player-led downtime that’s essential to the system – well, you might have a point.
I’ve been thinking about this for a while. I’ve run plenty of FITD one-shots, usually just ignoring the downtime rules – and they’ve worked perfectly fine. I’ve even hacked downtime to try and do two full-length scores in a single session. It’s tight – and it comes from a time when convention sessions were a little longer. I’ve been left with the nagging feeling that I’m not offering a proper showcase of what the game is about.
While you’re reading this, I should tell you about my Patreon. Patrons get access to content 7 days before they hit this site, the chance to request articles or content, and the chance to play in one-shot games, for a very reasonable backer level of £2 per month. If you like what you read, want to support the blog, and have the funds for it, please consider supporting here. Telling people about the blog, and sharing links/retweeting is much appreciated also – thanks!
In earlier prep technique posts, I’ve talked about 5 Room Dungeons, Sly Flourish’s method, using 3 Places, and starting with a con pitch. Most of those are focussed toward more traditional GM-prepped games – where you have a clear idea of the scenes and sequence of play the players will encounter in game. Today I’m going to share a technique I’ve been using to prep for Blades in the Dark, John Harper’s game of steampunk heists in a cursed city.
While you’re reading this, I should tell you about myPatreon. Patrons get access to content 7 days before they hit this site, the chance to request articles or content, and the chance to play in one-shot games, for a very reasonable backer level. If you like what you read, want to support the blog, and have the funds for it, please consider supportinghere. In addition, for this post, Patrons have access to my prep notes for the two sessions of Blades play that inspired this post – so they can see it in action!
With Blades (and other less GM-led games, including a lot of PBTA games – although some of those have other prep processes) – you don’t really know where the PCs are going to go. You prep a score, and some things that might happen in it – and then roll with the punches and dice rolls of the players. This can be intimidating if you’re used to a more traditional setup – and indeed, I’ve shown here how a more traditional setup can work with Blades as a one-shot – but it can really sing if you’ve done your prep to be ready to respond to players in a few different ways.
The idea behind this technique is to produce a bag of stuff that can be used during the session to keep it ticking along, in systems that do some (but not all) of the improv heavy lifting for you.
What’s This For?
In the examples below, I’ll be talking about Blades, and this definitely works for mission-based Forged in the Dark games. Some PBTA games like Masks and Monster of the Week have similar approaches – MOTW has a mystery countdown and a monster, and Masks needs your Supervillain statted up – and I think it generally works for more directly-plotted PBTA games.
If I was running, for example, Thirsty Sword Lesbians, Monsterhearts, or Apocalypse World as a one-shot, I’d definitely use this – because I’d want a strong inciting incident and a finite stage of locations for the action. In an ongoing campaign, I might be less constrained by the first step below, but I’d probably use the same process described below for Locations and Characters and Moments for each session.
Think About the Score
Disclaimer: in any post about how to prep a John Harper game, the first advice is – do what John Harper tells you to do. This is right there in the book, but it is a bit hidden away on p188 in the GM Actions section. Maybe it’s not hidden away – but I’d run Blades a few times before reading it.
In it, you need to consider the mission you’re offering the players – it has a structure of things to think about, like the target location, some secrets to be discovered, an obvious and non obvious approach vector – but nothing too concrete. Often the first scene – where a faction offers the score – is the only fully-prepped scene in the session, and this is where this tends to come out.
To tell the truth, sometimes I follow this process, and sometimes I just write a con pitch-style overview for the score. Generally the secrets and factions come out through the rest of the process.
One or Two Locations, Plenty of Characters
You’ll need to think about the main location where you expect play to take place, and you’ll need a cast of characters for the PCs to interact with. Generally I’ll try and prep more NPCs than I need so I can throw extra ones in when needed – and in an ongoing game those leftover characters will just reappear later. I use something like the Gauntlet’s 7-3-1 technique for this, and 7 is a good number total for these things.
In particular, having a way to portray NPCs at the table is really useful to make them more interesting – it’s only at the am-dram level, we’re not Critical Role – but it really helps to model a little bit of in-character dialogue from the players as well.
Moments
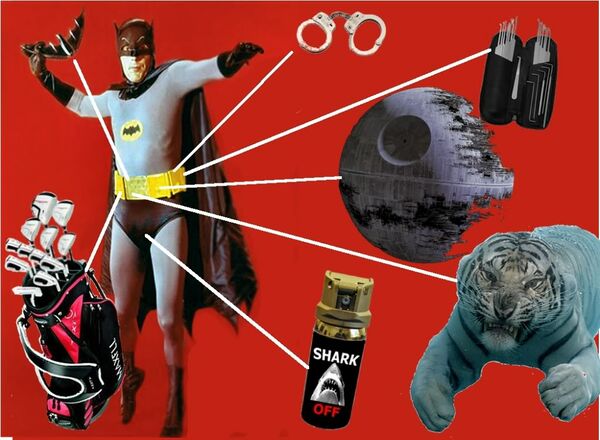
Moments are your Batman Utility-Belt of cool descriptions – including shark-repellant spray!
Moments is an idea lifted directly from Trophy – I think – although other Gauntlet games feature them now, and they’re a great idea. Basically, they’re background, system and setting neutral-ish things that happen to reinforce the tone and style of the game. If that sounds too fancy, these were what I had for an Infirmary raid score in Blades a few weeks ago:
A scream from a nearby room as a pair of drunken Billhooks play a deadly game of amateur surgery on one another and come running out
A covered body that appears to still be breathing
A neatly arranged table of surgical tools and chemicals
A panicked orderly desperately trying to ignore the chaos around them
Rows and rows of Bluecoats setting up to raid the Skovlanders
They don’t have to be amazingly original or interesting, but they help you to come up with something that gives the locations and setting more verisimilitude as you play without requiring boxed-text style prep.
So, with a score/opening scene, some locations and characters, and a few moments, you should be good to go. Extras to consider are – if you haven’t already covered them in the score prep – what sort of twists could arrive to complicate matters, and what secrets about their target could be revealed. Usually when I use this method, these come out organically from the locations and characters as I think about their motivations. What other prep techniques have you used for FITD / PBTA / other more loosely controlled systems?
Last weekend I was at Revelation, the convention for Powered By The Apocalypse (PBTA) and PBTA-adjacent games in Sheffield. I ran Fistful of Darkness (FoD), an in-playtest Blades in the Dark hack, over 2 slots on the Saturday, and faced some challenges as the game has a fairly baked-in metaplot. I’m going to share what I did to pace the session and ensure we had a satisfying conclusion and gradient of doom.
The Basics
As I talked about here, in PBTA you can make things easier for yourself by either pre-booking or limiting (depending on if you know your players) the playbooks available. Luckily I knew I had a Shot and a Wrench & Saw playing, so I knew that gunfights and steampunk mad science were going to feature heavily. I spent about forty minutes on prep at the table, getting some NPCs from each player, laying them out on index cards on the table, and getting some features of the town. As I always do with these games, during the seven hour run I had a couple of times where I took a break and asked the players to leave me alone while I did some mid-game prep – mainly involving trying to fold existing stuff into the plot, but more on that later.
Get Your Beats In
FoD has an in-built metaplot – the discovery of Hellstone is releasing monsters, and eventually the Four Horsemen, across the land, leading to an inevitable apocalypse. In play it has a Doom mechanic that triggers this, but I quickly realised that wasn’t going to work for a one-shot session. I decided to keep Doom as a track, but leave it similar to Heat in Blades in the Dark – if it gets too high, monsters will start actually hunting the PCs – and decide myself when the Horsemen made an appearance.
I then thought about the time I had. I wanted to start with an introductory mission that dusted off the system and introduced some core concepts to the players, and made this a ‘mundane’ mission – a completely regular wild west train robbery, with no magical content save for the discovery of Hellstone in the safe and discovery of plans for a Hellstone claim. At the end of the first (3-hour) session I wanted the First Horseman to appear, and then the other three were to appear in the second act – one at first fairly early, and then two at once to herald the apocalypse proper about an hour from the end, to propel the PCs to the final action to try and prevent it.
Chekhov’s Apocalypse Horsemen
In play I tried to steer everything to make the appearance of the Horsemen tied to their own actions – any chaos they created, or NPCs they killed, inevitable came back to bite them as the situation got worse. Neatly, they managed to frame one NPC for murder almost by accident, so when he was hanged in the centre of town he came back as the Hanged Rider. As the players interacted with the town and its environs, the chorus of NPCs responded in kind, becoming more angry and bestial, so hopefully the final breakdown of the barriers between worlds felt natural.
There were also mundane re-incorporations; as part of the initial setup two PCs determined they were in town to compete in a poker tournament, so when we fleshed that out as a riverboat tournament it became a centrepiece scene.
Be Prepared! (to ignore your prep)
As well as an overall sketch, I had six jobs ready for the PCs that, while not directly related to the metaplot, could be twisted and folded into it. As it was maybe two made an appearance, and heavily modified at that, but several of them were options for the PCs to explore – they just chose not to, as there were always more pressing matters to attend to. I’d like to think that, like the side missions in an open world videogame, they added depth to the world, and I felt better as a GM knowing I had some prep I could fall back on. These were literally randomly rolled on the FoD tables.
Enjoy Yourself!
One of the true pleasures of these sorts of games is the unexpected scenes that come up, often from failed rolls. There were at least three of those scenes that I never could have expected in this session, and that made it all worthwhile. I do find running PBTA/FiTD games more exhausting than more traditional games – it’s the feeling of having to stay on top of everything and focus your moves all the time – but it’s worth it.
In my other games at Revelation, I played the fantastic PvP space fantasy epic Spacewurm vs. Moonicorn, and an excellent British millenial superhero romp of Masks. All excellent fun – and it’s happening next year as well. Have you used any techniques to embed metaplot or story advancement in otherwise improvised games? Comment below, or find me on twitter.
Welcome to the second part of my thoughts on running Blades in the Dark as a one-shot game.
In Part One, I talked about using a structured Training Mission, similar to the introductory levels in video games, to introduce the game in the first half of a one-shot. Here, I’ll talk about the changes to Downtime and the transition to the second mission.
Payoff, Heat and Entanglements
Once the first mission is finished, give the PCs their payoff – be generous, and make sure that you describe what it looks like, since the Coin descriptor is arbitrary for new players to Blades – a couple of heaving chests of coins and a bracelet you can hawk to Mordis in the Night Market is much more rewarding than just “4 Coin”.
The next time I run Blades, I’m going to have a bowl in the middle of the table for Heat with counters for the expected amount of Heat for the mission, and add to it as complications and devil’s bargains occur – but I’ve found that for the first mission Heat can be quite tricky to engage with. Still, roll for Entanglements from the Heat generated, and be prepared to be brutal in interpreting it; it’s quite possible in the first mission that PCs still have plenty of Stress left, so giving them some heavy Entanglements gives them something obvious to do during Downtime.
Downtime
Between the missions I run a simplified “Training Downtime” that just gives the players a taste of the mechanic. The reasons for this are twofold – firstly, in an ongoing campaign downtime can bloat to a very enjoyable, but time-consuming, player-led exploration of the factions and setting of Duskwall. Secondly, the players haven’t had chance to make much trouble yet, so they are unlikely to have many schemes of their own to accomplish. As with any one-shot, we want to avoid players wandering around aimlessly, so this shortened version allows the players to achieve their goals and have some agency while still keeping it moving; I aim for 30-40 minutes for Downtime, and then take a break and introduce the next mission. My modified one-shot Downtime rules are below.
In Downtime, you can pursue one action from the list below. This is a change from RAW Blades where each PC gets two actions, but don’t worry, you’ll be generous with some of the actions. A couple of them have changed as well – since starting a Long-Term Project in a one-shot is a bit dissatisfying.
Indulge Vice: As the regular Blades rules. If anyone overindulges, either add an additional entanglement (if there are players left to take their action, since this gives them a chance to overcome their crewmate’s actions) or add Heat to the next score.
Work on a Project: This replaces the Acquire Asset and Long Term Project actions from the regular Blades rules. Ask the player what they want to achieve, checking it fits with the fiction, and start a countdown clock (in almost all cases, I’d make it a 4-segment one, to give them a good chance of achieving it in this downtime). Progress is as the regular rules on the roll of a Trait (1-3: one, 4/5: two, 6: three, Crit: five). Other players can also work on already started projects, rolling an appropriate trait and adding sectors as above. This allows the players to work together to achieve projects during Downtime and have them take effect during the one-shot.
Recover: If anyone needs Healing, they can choose this option as per the regular Blades rules
Reduce Heat: It’s unlikely that players in a one-shot will be careful enough to want to keep their Heat down, but they can do using the regular Blades rules.
You’ll notice that there’s no Train option. This is because there are a few options for experience in one-shot Blades games that I have yet to explore and will explain below.
The Next Mission
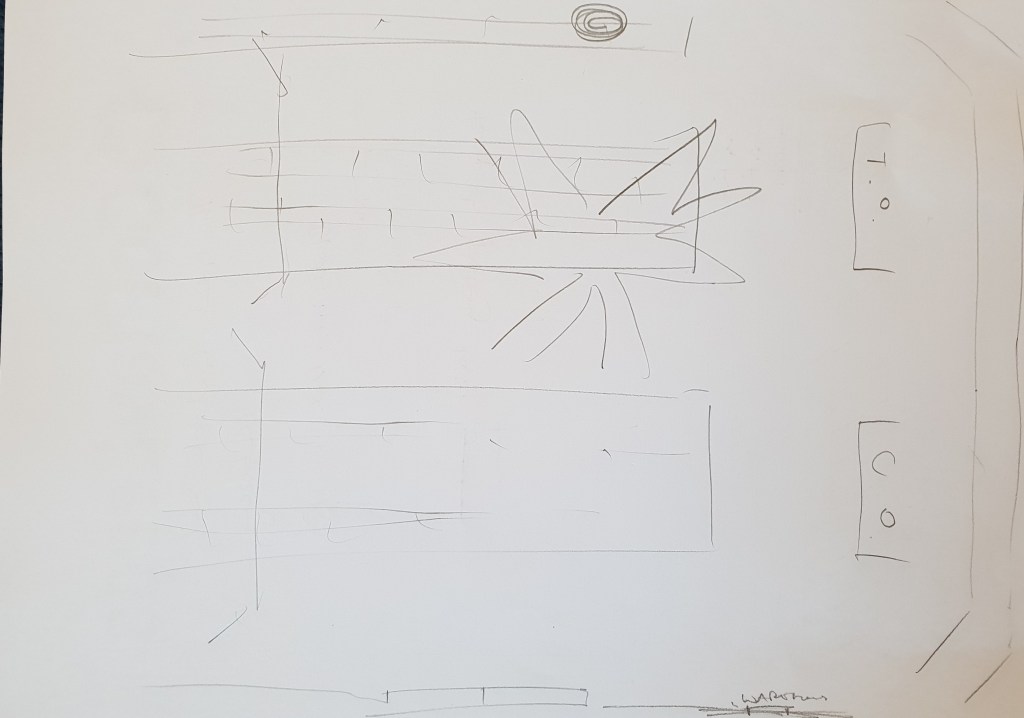
My notes for Gaddoc Rail – pencil were added during play
After Downtime is done, take a comfort break and introduce the next mission – this is a regular mission, but be sure to reincorporate any established facts about the setting – use NPCs already established and factions already introduced.
In terms of prepping for this mission, I like to keep it as loose as possible – I write four lists:
A list of descriptors of the main location of the mission. For Gaddoc Rail, this is the station itself, but it could be the base they are infiltrating, the party they have to explore, and so on.
A list of options for what the score could actually be / any opponenets. For Gaddoc Rail, since what you are stealing is not defined, this was examples of what it could actually be.
Obstacles – all the possible obstacles I can think of to oppose the PCs during the score
Some possible Complications. In the past I’ve found this the hardest part to prep, but I’ve got a lot better by not dismissing obvious suggestions – sometimes the obvious thing is the best
With these four lists, I have plenty of options to draw from when the players look at me expectantly. It also makes it much easier to pace the game in a one-shot, since I can use as many or as few as I want to make the score enjoyable but keep to time. I’ve used a similar approach in lots of PBTA games, and talked about it in a post here, and it’s a really useful one-shot technique.
Gaddoc Rail station map, mid-score – spot the “Explosion” Complication
XP and Training
I’ve not had chance to explore/hack the XP system in Blades for one-shot play, usually because I always forget about it – and there’s quite a lot for players to get their heads around anyway, but if I do, these are the options I’d explore
Just ignore it. There is no experience or advancement. This, the default, is what I’ve generally used
Use it as in the Blades rules. It’s very unlikely that you’ll get any advancement in the session, but that keeps it simple, and prepares the players for the full system. It also makes it easy to transition to the regular Blades. If I used this, I’d give everyone a bonus “Train” action in Downtime, giving the 1 XP to an attribute of their choice
Hack it for advancement. Start everyone with 2 XP marks on each XP track, and double all XP awards – 2 XP for each Desperate roll, and 2 XP for Training in downtime. It’s up to you if you give the bonus Train action, but if I’m going to the trouble of this, I might well. With this, a few of the players will advance during the one-shot
In summary, while Blades is a fantastic campaign game, it’s also a lot of fun in a one-shot setting; as I stated in the first post, I’ve managed 3 scores in a 5 hour session using these guidelines and it certainly felt like the players engaged with both the rules and the setting – they achieved quite a lot in-game in those three scores. For further reading, check out the Forged in the Dark games which are emerging using the same rules set. There’s far too many of them to try them all, but I can certainly recommend Scum & Villainy for Star Wars-style “ashtrays in space” space opera.
I’ve been working out how to run Blades in the Dark as a one-shot for a while. The first couple of games I’ve played/run managed to get through character and crew generation, and one score, in the 3-4 hour session, and while that was a great introduction to the game, there were a few things I wasn’t sure about with that
character generation is fun and exciting, but crew generation is often not; players negotiate awkwardly with each other and the sometimes over-think choices
the setting needs to be explained quickly and concisely
factional interactions (in crew generation and after the score) take too long to explain and monitor
the pattern of score – downtime – score is a key rhythm of longer-term play; it seems a shame to neglect downtime entirely in the one-shot
With this in mind, I set about working out how to give a satisfying one-shot experience. I used to run a lot of Mouse Guard, which has a similar turn structure, and I used to make sure that I did a GM’s Turn (where they completed the first half of the mission – often this started in media res and there was little chance to prepare or negotiate approaches), a Player’s Turn (where they tried to recover from conditions, and planned for the next mission – which they had a fair idea about from plot threads in the first section) and another GM’s Turn – a more player-led mission where they might have to assemble allies or negotiate approaches, with multiple means of resolution.
With that in mind, my Blades one-shot structure now looks like this
Players pick playbooks from a restricted list
GM introduces Crew sheet and abilities (already picked, but without a name / hideout)
Players play “Training Score” – Race to Gaddoc
Downtime activities – simplified and quick
Players play a full score – either the starting score or one of Sean Nittner’s scores – I’ve used Gaddoc Rail a couple of times
Does it work? Well, by beginning with a simple score, the players get a chance to learn the ropes of the system and what approaches they can use, which makes the second score much more straightforward – they risk stress, use flashbacks, and really invest to make sure it works. I ran it at Go Play Leeds recently and we managed another score after Gaddoc Rail – which was short and sweet thanks to some really good rolls, but it still gave a sense of progression to the game beyond the “one score and out” approach I’d used previously.
For the playbooks, I reduce the choice to just Cutter, Hound, Leech, Lurk, and Slide – the other two are a bit ‘weird’ and can be a stretch to get the players involved if they aren’t going to stretch it themselves.
The crew are Shadows – probably the easiest crew sheet to get in with – I put the crew sheet down, tell them after the first mission they’ll have a name for themselves, and tick the first Special Ability – Everybody Steals – so they all get an extra dot in Finesse, Prowl, or Tinker.
For the training score – Race to Gaddoc – I have some pre-prepared scenes based on what playbooks have actually been selected. I don’t have to use all of them, but enough to make sure everyone has enough spotlight time – they are pitched at one of the playbooks in particular, but there’s no need for that person to necesarily resolve the issue. The scenes are below (a .pdf with all of the details in one place will be linked in Part 2 when I post it next week).
Race to Gaddoc – A Training Score
Explain the starting situation – as a gang of ne’er-do-wells out to make a name for themselves, they have been asked by Lyssa, new leader of the Crows, to transport a rare case of Iruvian Brandy across the city to the Railjacks Guild at Gaddoc Rail. The problem is, she obtained this Brandy by stealing it from the Red Sashes, and the Bluecoats are looking for it as well, so this won’t be an easy task
Explain that this is a Transport task, and ask them for their Route across the ciry – they can choose to go by the alleyways and side-streets, or by the rivers and waterways, or they can try and disguise themselves as respectable merchants
Don’t allow too much planning, but they need to pick their Load based on the approach chosen
They make their engagement roll: 1d for luck, and if they have added anything to the approach which is useful, they get +1d for a better plan. They can also add in their friends or contacts if that’s relevant for +1d (only one friend can be involved)
Randomly select who rolls the engagement roll – unless somebody wants the responsibility
On a 6, it’s all going swimmingly until the acts below happen – their rolls will generally by Controlled to start with
On a 4-5, there are complications – rolls will start at Risky
On 1-3, it’s all going wrong – rolls begin with Desperate
Select encounters based on the Playbooks chosen as below
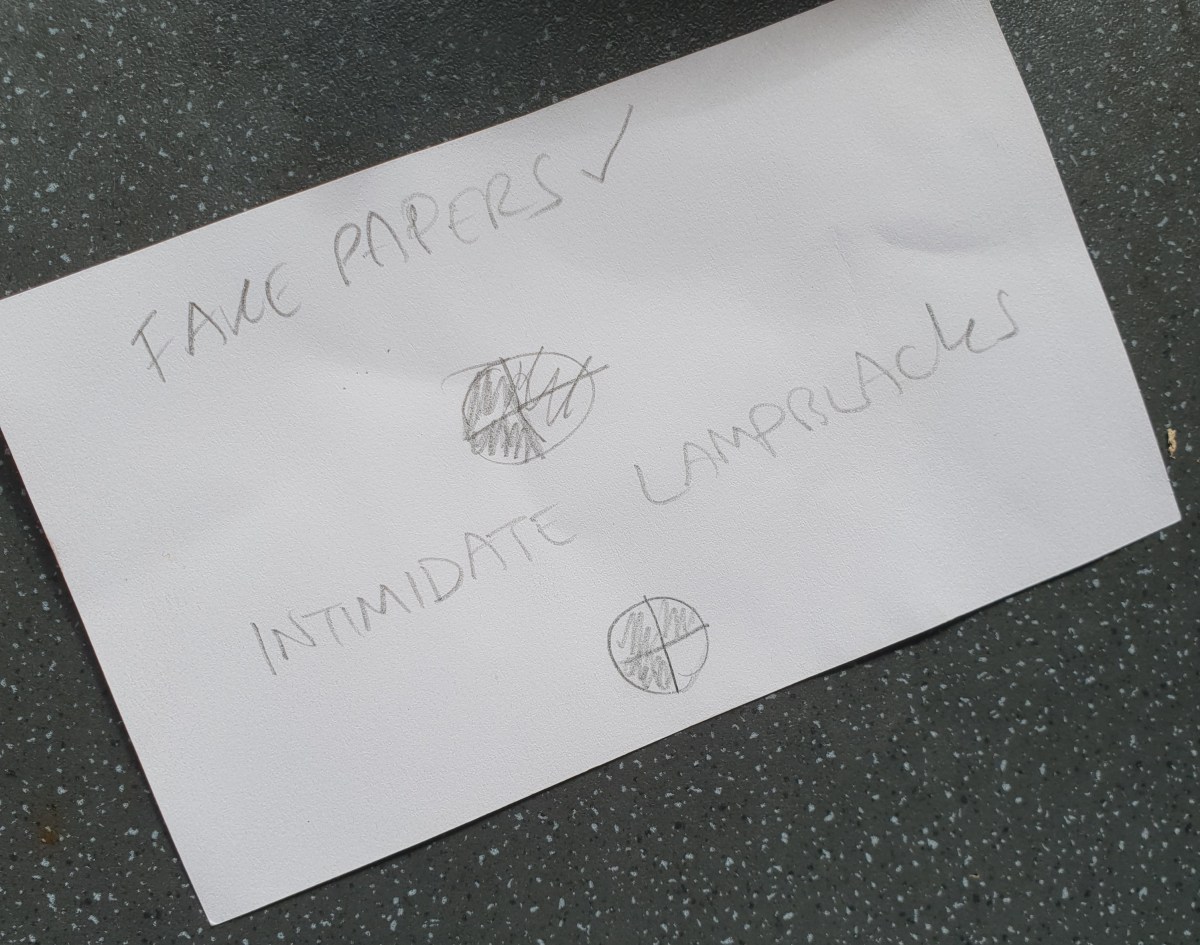
Cutter
As they turn a corner in an alley, there are two heavies from the Lampblacks there – they wanted this job, and don’t see why they shouldn’t have got it rather than these upstarts.
Controlled: they’ve got their backs to you and are talking about the problem,
Risky: you see them sizing you up, threatening you – maybe they can be reasoned with, or at least surprised?
Desperate: there’s a knife at your throat before you know it and a threat in your ear. They’ve been tracking you since you left the Crow’s old watch tower hideout
Results of failure are likely to be Harm! Either way, they should escape to continue the mission. Also, use the level of success to determine the position for the next roll – if it’s successful, the next roll is likely to be Controlled or Risky, if it’s a failure, it might well be Desperate, and use the fiction to snowball into this
Hound
As you round a corner towards your goal, you can see the Red Sashes are tracking the route to the station – there are sharpshooters on the rooftops around the alleys or waterways, and you can see their Iruvian bows glittering in the breeze
Controlled: They are patrolling, but haven’t noticed you yet – they should be easy pickings
Risky: As above, but you can see they’re watching one another as well, tracking the alley/road/canal you’re coming down – and it’s too late to turn round, and carry alarm whistles – you’ll have to take them out quickly
Desperate: One’s looking straight at you, whistle in his mouth and bow at his shoulder about to shoot
Results of failure could be Harm, or to start a Red Sash Alert! Clock (4 sections) that can be filled in by future rolls. If it fills, they’ll have the full force of the Red Sashes waiting for them at the Railjack Yard and have to fight their way through
Leech
You’ve found the perfect short-cut – just around this building and you’ll have it, you can walk right through the main square without ducking round. But you’ve got an array of construction apparatus blocking your path – maybe it’s time for a little engineering to get through it?
Controlled: As above – there’s a web of rickety scaffolding around you, that need disassembling quietly and safely so you can proceed
Risky: The scaffolding is rickety and groans as you touch it – and there are construction workers just around the corner moving around – you’ll have to work quickly
Desperate: With a sickening crunch your cart is pinned beneath the web of a scaffolding link. There’s a commotion above and you can see hard-hatted engineers making their way towards you to investigate
You could start a Bluecoats clock as a result of failure as they are alerted to you, or fill in another clock
Lurk
The area of Nightmarket around the Railjack’s yard is crawling with Bluecoats, Red Sashes, and everyone else from Duskwall. You’re going to have to sneak past them to get in – maybe use the rooftops, or the sewers. This is a good opportunity for a Group Prowl roll.
Controlled: They are milling around, but they’re not looking for anything in particular – could be you could sneak past in plain sight
Risky: They know a shipment is coming in from the Crows and what it is – the case has been reported missing, and there are sniffer dogs around who have the nose for brandy
Desperate: They are looking for exactly the group that the Crew represent. It’s rooftops or sewers, or there’ll be trouble.
Slide
The Railjack‘s yard is surrounded by customs officials – they’ve had a big shipment of blood in and there’s no way at all that the players can come in for business, or otherwise
Controlled: It should be a simple matter of showing your papers though?
Risky: There’s Bluecoats and/or Red Sashes moving around as well, talking to the customs men – depending on the state of the clocks
Desperate: Behind the man is a hastily-sketched likeness of your Cutter, for this or a previous crime
After this, they can deliver the Brandy and update the crew sheet – give them +1 with the Crows and the Railjacks, and -1 from the Red Sashes and the Bluecoats. Take a break!
In Part 2, I’ll talk about the changes to Downtime to make it quick and easy, and how to transition to the second score.
 As I talked about